A playful muff for my gran

This is a playful two sided muff for my gran.  I knit it with some foundling wool at the thrift shop.  One side is a variegated green and the other a fusion of reds and purples. My Gran will be 95 in the spring and has the early signs of dementia.  Apparently these muffs  help keep those with dementia calmer by allowing for the hands to fidget in a warm place. 

DSC01538

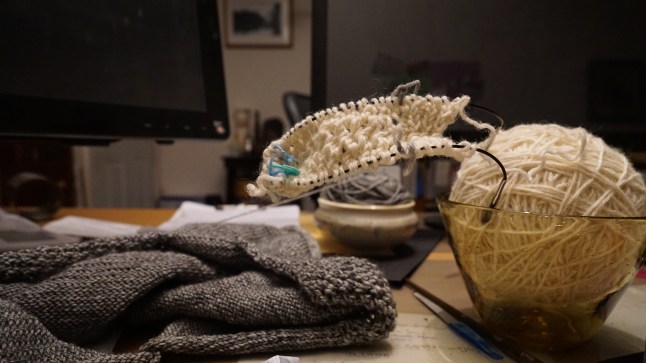
I picked up the instructions on Ravelry.com. With chunky wool – a mix of colors and textures is best.  Cast on 88 stiches and make the whole muff about 20 inches long.  Knit to your hearts desire – the more stiches and variance in the texture the better.

Then comes the fun part.

DSC01519

The bobbles, bits and button that are large, shiny, smooth, bumpy and just fun.  Chains, zippers, laces, and other nice things that will survive an industrial wash or two are good too.  

DSC01529

So I delved into my stash for these bobbles.  Once I had chosen the bobbles, button and such, I threaded groups together in random colorings and textures. I found some nylon/cotton kitting ribbon that I uses as my Gran would love the color.  I used a doll makers needle – the really long one in the center of the photo above for most of this treading.

I pulled some cotton laces into a long squiggly thing .

DSC01518

Threaded together buttons to form a couple of chains for her old fingers to find in the warmth. 

Next I picked up a threaded set or a button and sewed it firmly in place by weaving though a few kintted stitches and then though to the back where a placement button was waiting for the tie off.

DSC01535

The shot below  is the  underside of the placement with the button and knots.  It is ok to leave the long bits, they will add to the texture and weight and that is good.


DSC01536

So, when I had attached all of the bits that I had set up, I then folded the two ends and attached them securely with a slip stich using the tail of the knit.

Apparently this playful muff will distract her from the frustration of loosing her memory. So, I hope at least.

DSC01537

Thanks for reading.  Pass it on, care homes in Canada have found that these really do help.  

Weekly Photo Challenge: Dancing with creativity

Do you enjoy your creativity? I do, I often dance between projects and work.  The grey is for the Grace sweater by Jane Richmond.  So far so good.


The yarn is Sweet Fiber DK in smoke.  It is wonderful to work with.  Still on the first sleeve so it is will be a bit. DSC08256

I found that butting a chair up to my desk was a good holder for the skein to wrap it up into a usable ball.DSC08245

My other project is mine by design.  I was never one for the points in hoods so I stay away from them until I had an idea.  The first run looks good.  Now to draft the pattern.

DSC08215DSC08222DSC08228

Felted Wool coat is finished and warm for winter

coat 1Solstice finishings 007  Solstice finishings 005Just in time for Winter I finished the coat!

dec 20 13 011dec 20 13 017I removed the excess cotton lining from the sleeves and finished by folding the silk up and over the cotton and slip stitched to the wool. This stoke of laziness gave me a warm inner sleeve as the silk falls gently around my wrist.

I created hoops of hemp thread for the hooks at the top and waist. They work really well.dec 20 13 004dec 20 13 027

This was an overly long project but worth every bit.  The coat will keep me warm for our west coast winters!

The Washed wool coat–an update.

The coat is coming along albeit slowly!  I have lined the coat with cotton quilt batting and again hand stitched it into place.

The collar is attached – the neat thing about washed wool is that the felt can be left unfinished at the edges.  At least I will try.  Today I will add pockets to the front though all layers then will begin on the silk lining.  I hope to have it finished by the onset of the cold and I know that I am cutting it very close. Distractions from Darkness 007sunday 009

sunday 014sunday 020

sunday 019

Basted: The washed wool winter coat.

Basted: My washed wool winter coat.  The beginnings.


Wool coat front side panel

The washed wool was a 4 meters of wool plaid found at the thrift shop for 10$.  I washed it in hot sanitize cycle of my washing machine with the bath mats and slippers!  This was done over two years and the material stuck around in the stash.  I suspect that this winter will be cold and that I need a proper warm coat.

For the pattern, I am using the 1912 traveling coat. https://austerity101.wordpress.com/2012/08/08/now-for-my-jacket-2/ I really like the princess cut of the pattern.  It is easy to meld into my shape.  As I added greatly to the length to bring the coat to just above my knees I found that I was a bit short.  So the under sleeves and front under panel are in the natural wool.


Other things 023The coat will comprise of the washed wool in plaid and a natural wool also picked up from the thrift shop for a few dollars and washed the same as the plaid over time. I purchases some quilting cotton batting for the inner layer for warmth.  The lining will be in blue sand washed silk. Again, a thrift shop find of 6meters for 20$.

Other things 022


Nov 7 13 014When I put the cut wool  pieces together and sewed them on they shifted.  And that was with the walking foot in full gear!  So, I pulled each seam apart and hand basted each seam so the plaid now matches at all seams.

Washed wool coat front zipper view

The front opening is by zipper on the left side.  Again this was had picked into place and topstitched by hand to keep it there.

Washed wool coat - basted front view

Washed wool coat - basted backt viewSo before I can add the interlining and lining, I will topstitch by hand all seams.  This is to seal each seam with the overlap.  It will add bulk that will be hidden once the interlining is in place. Then I will steam the seams.  Then on to the interlining, lining, hood and cuffs.


Washed Wool

Other things 023

Funny that http://didyoumakethat.wordpress.com/2013/10/20/fabric-focus-wool/ has wool as the Fabric Focus.  This is wool that I have washed – sanitized in the washing machine for about 2 hours with my hemp slippers to felt the wool. I would do this three or four times when doing some deep cleaning on rugs and slippers to get a felted wool. These materials are part of my stash of thrift store material purchases. So no great loss if I bung it up.

As the main body is plaid each peace was individually cut to match the plaid. Wool coat front side panel As this is a curvaceous pattern the end matching should be close but it is too soon to tell. The wool cuts like butter and no fraying involved! Cut wool

Here is my posting of this pattern last year  https://austerity101.wordpress.com/2012/07/11/now-for-my-jacket

For this coat I have lengthened the pattern to knee lengthThe pattern adjustment. The beige will be the front facing and the under front panel. It will also be used for a collar which I have to create and the under sleeves.  I haven’t ironed the wool as it will undo some of the felting and I am hoping that this process will keep me dry and warm this winter.

Other things 022 This bright blue will be the lining.  It is sand washed silk and very thick.  It also is a thrift shop find of 20$ for 4 meters – plenty to line a long coat.

In between the wool and silk I will put in a cotton quilting felt to add to the warmth. Each piece will be cut to the felt – so it will take a bit before I can post the finalized garment.


Cape idea 2 – from a single piece of fabric and some hemp thread!

Cape 2  from a  single piece of fabric and some hemp thread.

Sep 12 13 055

Hemp Thread – yes Hemp!  It is .2mm and I think too big for my machines so hand stitching is in order.

Sep 12 13 056

Recently purchased wool plaid from the thrift store was begging to be a wrap. It measured 172cm long and 155 wide.

Sep 12 13 037

So, I started to fold at one corner 8 inches ( I use both metric and imperial in my sewing and cooking – it comes from starting my school years in imperial measurements and having to learn metric in middle school) from the raw edge and folded to the count of 10. Secured it with some pink hemp thread As this is only a test, I hand basted the raw edge of the plaid with more pink hemp.

Sep 12 13 050

Then I got another Idea and it was not to pleat the left side but to bring it up in a swanky way.  To complete it I did a fast chain stitch on the left side to keep the folds in place for the drape of the hood.

Sep 12 13 060Sep 12 13 061

So this is what I now have hanging out with Daisy (yes, I named the thing that pretends to be me for these photo shoot.)

Plad Cape with folds 1Plad Cape with folds back 2Plaid Cape front 3

The beginnings of a cape.  It is asymmetrical but has a nice look.  To finish this, I need to baste the bottom hem as it is the cut side of the fabric, craft an opening for the right hand and imagine a closure for the front.

But should I take the time to finish it or rip it apart and make a skirt? Or pants, or vest? you get the idea.  Feedback is always appreciated.

I have already started a new one but it is only pinned.  It is a dusty rose-pink from the 80’s,  a woven silk with a very nice drape. It is my next part of the little sewing no cutting capes that bellow from my fabric stash.

The cape finishing touches

DSC02132

The Lining with hemp linen pockets.

In between clients, certification for 2012 US tax preparation, Christmas and the infinity of a bad back I have managed to make some headway on the cape.

It is fully lined in a purple jacquard cotton.  It hangs wonderfully and is a nice fit on the shoulders. To the lining I have added pockets from some scrap black hemp linen leftover from a vintage dress a few years back.

I have added the brass dragonfly’s as closures for the front.


From my jewellery box I am using beads and unworn pendants as fobs on the end of a silk ribbon to hold the cape closed.


Surprisingly they do the trick.DSC02111

DSC02098

DSC02095
Suitable bobbles from the jewellery box.


DSC02117

A close up of the dragonfly closures with the silk fobs holding the front closedDSC02116DSC02112

I am working up the courage to cut in to the sides and make the armholes!  It is like a puzzle but without the finished picture on top. So, I am taking it slow.